Resolutionary relies on Game Editor's draw_from(); function for resizing the actors, and thus, has the same limitations as the original function. Before you start implementing Resolutionary into your game, you should consider these limitations.
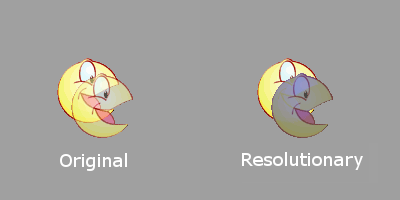
Drawing transparent actors on a canvas produces lacking results. A comparison between the original game view and how it looks when rendered in Resolutionary as two dynamic actors.
Transparency is broken
The way canvases in Game Editor handle drawing transparent actors is pretty bad for Resolutionary - the colors of the actor get distorted and the area of the canvas itself becomes transparent.
To make matters worse, this also applies to any transparency in the animations of the actors. So, images that utilize an alpha layer to add transparency to individual pixels will be distorted. Using anti-aliased .png-images, for example, will result in visible artifacts on the outer edges of the animation.
Resizing tile actors is not supported
If you've already built your levels using the Game Editor's built-in tiling feature, the only way to make the project fully compatible with Resolutionary is to redo the levels in some other form.
Resizing text actors is not supported
You will have to use some other methods for resizing any text actors in your game. One possible solution could be to position all text actors relative to the edges of the screen, and then use different font sizes for different resolutions. Another way to solve the problem for static text actors could be to convert them to normal actors with pictures of the text.
After you've considered the limitations of the system and concluded that your game is compatible with Resolutionary, read here for instructions on how to get Resolultionary, and how to merge it into your game.
Download the most up-to-date version of Resolutionary as a .zip package via the link above.
Use a program like WinRAR or 7-Zip to extract the files from the .zip.
Open your game in Game Editor.
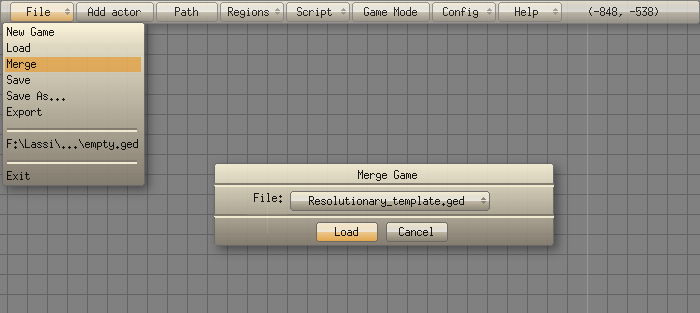
Select File -> Merge and navigate to the folder where you extracted the files from the .zip. Select "Resolutionary_template.ged" as the file to be merged into your game. It can be found inside the folder "Template".
Background color has been set to gray, and black bars are set to be black.
(optional) Use resSetBackgroundColor(); to set a background color for your game. If you don't specify a color, the color black will be used by default.
(optional) Use resSetBorderColor(); to set a color for the borders that will appear if the game is scaled to a resolution with an aspect ratio differing from the original resolution. These borders are often called "black bars", but you can use any color you like. If you don't specify a color, the color black will be used by default.
Use resStart(); to start the Resolutionary system.
Use resQuit(); in a Key Down event of your choice (excluding Esc) to quit the Resolutionary system before exiting the Game Editor game mode. This is important for avoiding memory leaks. More information can be found on the Resolutionary Reference page.
Resize the Filled Region actor called resActorDetector by dragging its corner so that it is the same size as the view actor in the original resolution of the game.
The calls to resSetBackgroundColor();, resSetBorderColor(); and resStart(); can, for example, be placed in the Create Actor event of view, so that the system will start up right away with the game.
// view -> Create Actor

resSetBackgroundColor(128, 128, 128); // Make the background gray
resSetBorderColor(0, 0, 0);           // Make the borders black
resStart(640, 480);                   // Start Resolutionary (the original resolution of the game is 640 x 480)
These are the steps that you have to take every time you want to change the resolution of your game.
Set the resolution of your choice for the game from Config -> Game Properties -> Game resolution.
Resize the actors resDynamicLayerCanvas, resStaticLayerCanvas and resMouseClickDetector so that they are the same size as the view actor.
If you now enter Game Mode, you will see your game scaled to the resolution you selected. There may be some errors in the way your game is drawn, but don't worry, that's just because so far we've only set up the basic parts of Resolutionary, that are the same for every project. After these steps some further adjusting may be needed to fix positioning problems and to increase the performance of the scaling system.
Check the support page for help on solving a variety of basic issues that may occur before adjusting the system properly for your game.
Convert Out of Vision events to Collision Finish from resActorDetector
Why: The Out of Vision event of an actor is triggered when the actor leaves the area of the view actor. This makes the correct behavior of the Out of Vision events depend on the view actor being exactly the size of the visible game area, like it almost always is. But when changing the resolution of the game, the size of the view actor also changes. And as the main purpose of Resolutionary is to make it possible to change the resolution of a game, the consequence is that the Out of Vision events are not compatible with Resolutionary. Luckily, the resActorDetector actor is sized exactly the same as the original size of the view actor (see Initial Configuration: 5), so it can be used to simulate the Out of Vision functionality.
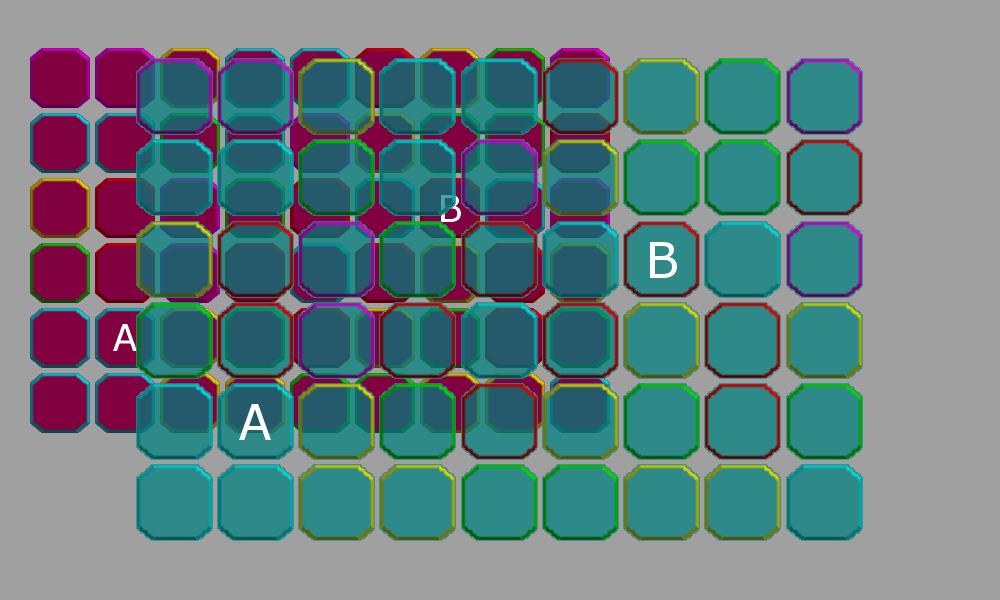
The actual game view and the Resolutionary view illustrated in relation to each other. The magenta blocks are the actual actors and the cyan blocks show where Resolutionary draws them. Two arbitrary actors have been labelled together with their Resolutionary counterparts.
Convert Mouse Enter and Mouse Leave events to Collision and Collision Finish events with resMouse
Why: Game Editor only registers Mouse Enter & Mouse Leave events for the actor with the highest z depth at the position of the mouse. The canvas actors that Resolutionary uses to draw the scaled game hide all the actors of the original game, disabling their Mouse Enter & Mouse Leave events completely. As a workaround the resMouse actor is used to simulate the mouse position, so any Collision and Collision Finish events with it can be treated as alternatives for Mouse Enter and Mouse Leave.
Convert Mouse Button Down and Mouse Button Up events to Activation Event from resMouseClickDetector
Why: Resolutionary doesn't scale the actual actors in the game, it just draws them on a canvas with the correct scale. With the resized actors being merely drawings on a canvas, they can't be clicked - the Mouse Button Down & Mouse Button Up events are not triggered for the actors by clicking their drawings. Also, the actual actors don't line up with their resized drawings correctly, so using EventDisable(); to disable mouse events for the Resolutionary actors for allowing clicking through them would still not solve the problem - see the illustration that demonstrates this misalignment.
Resolutionary has a built-in Debug Overlay for inspecting the system's status during run time. To enable the Debug Overlay, set RES_DEBUG to 1.
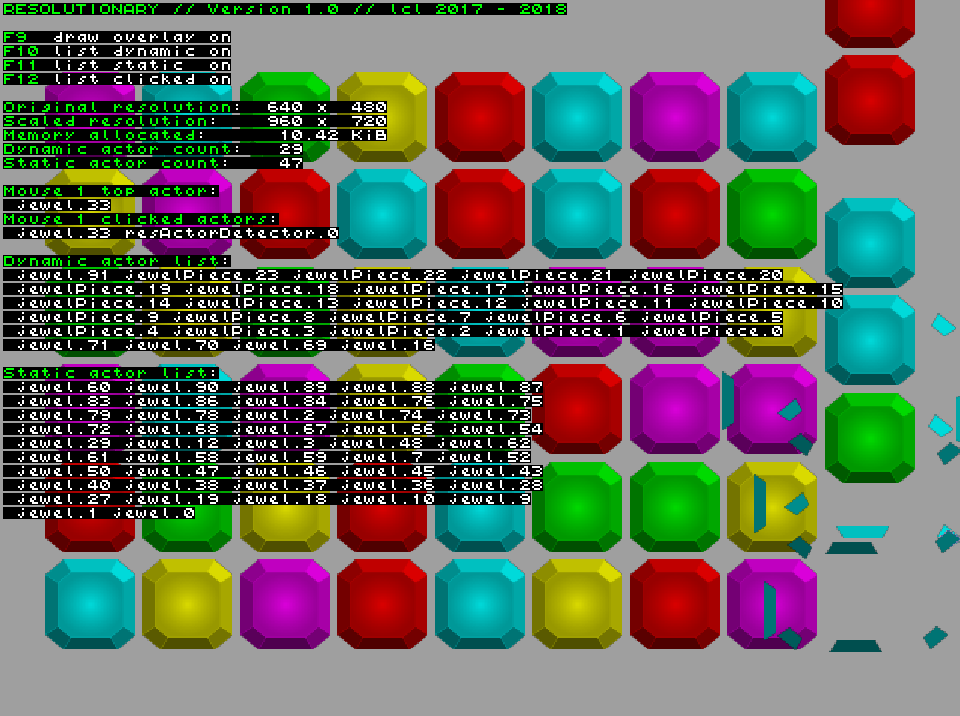
The built-in Debug Overlay
(RES_DEBUG_FONT_DOT_SIZE has been set to 2 for improved legibility).
Overview
Important The Debug Overlay is drawn using putpixel(); and is thus likely to decrease the overall performance of the system.
The Debug Overlay can be used to inspect what's going on inside Resolutionary at any moment of the game. It can display the following information:
The number of currently active dynamic and static actors
The amount of memory allocated for the system (KiB)
What actor(s) are being clicked by what mouse button, and which of them is the "top actor"
Listings* of the names of the currently active dynamic and static actors
* The actors are listed in the same exact order as they are drawn, i.e. ordered by their ascending z layer.
Debug Overlay controls
The mode of the Debug Overlay can be controlled by the keys F9 - F12.
F9: toggle overlay drawing on / off
F10: toggle listing of dynamic actors on / off
F11: toggle listing of static actors on / off
F12: toggle listing of clicked actors on / off
Debug Overlay display settings
You can adjust these values to modify the behavior of the overlay.
RES_DEBUG enables and disables the Debug Overlay (enable: 1, disable: 0).
RES_DEBUG_UPDATE_FREQ determines how many frames the system will wait before updating the data shown on the overlay (default: 5).
RES_DEBUG_NAMES_PER_LINE determines how many actor names will be printed on one line (default: 5).
RES_DEBUG_PRINT_MAX_LENGTH determines the size (number of characters) of the debug string. If the overlay says that the debug string has been overflown, you can solve the problem by increasing this value (default: 2048).
RES_DEBUG_FONT_DOT_SIZE determines the size of an individual pixel on the Debug Overlay. Increasing the value makes the text larger (default: 1).